Everything you need to put Power BI reports inside your own application — the two embedding patterns, the prerequisites, the code, the common errors, and an honest answer to how long this actually takes.
TL;DR Embedding Power BI in a website requires a Microsoft Fabric capacity, an Entra ID app registration, a backend service to generate embed tokens, and frontend integration with the Power BI JavaScript SDK. For external users, use the app-owns-data pattern — a service principal authenticates centrally and viewers don't need Microsoft accounts. A realistic timeline for a production-ready integration is four to six months for a small engineering team. DataTako handles all of this and gets you to a working portal in hours instead of months.
Two patterns: user-owns-data vs app-owns-data
Before any code, the architecture choice. Power BI Embedded supports two embedding patterns, and they have completely different implications.
User-owns-data is for internal embedding. Every viewer signs in with their own Microsoft Entra ID identity and the embed token reflects their permissions in Power BI. Useful when all your viewers are colleagues on the same tenant. Every viewer needs a Pro licence. Won't work for external users.
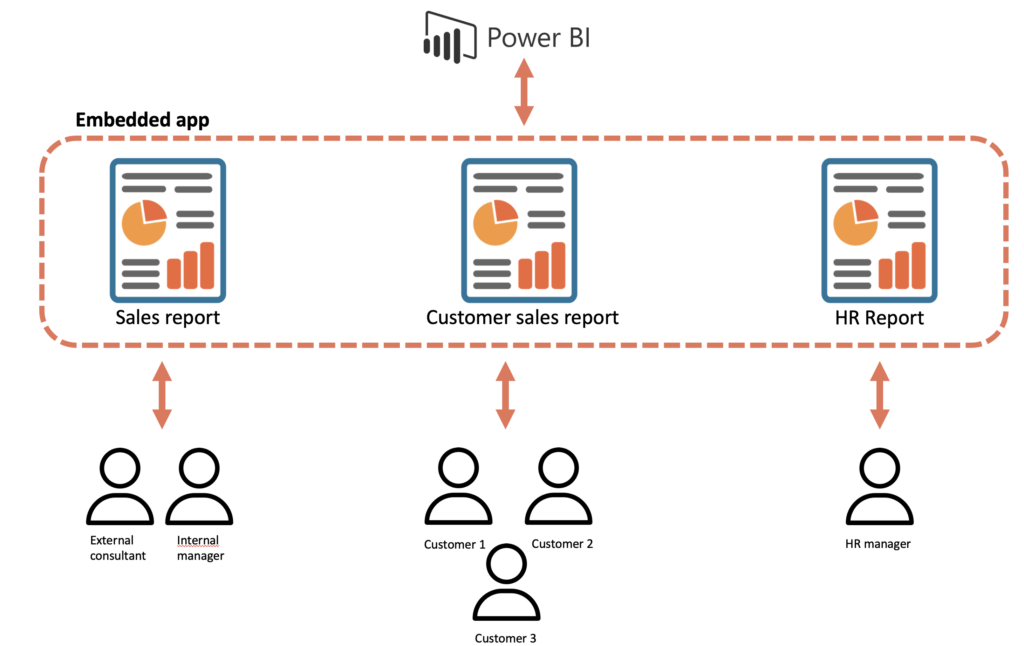
App-owns-data is for SaaS embedding. Your application authenticates to Power BI via a service principal, generates embed tokens that carry whatever identity your app uses, and viewers consume reports without Microsoft accounts. This is the pattern for embedding analytics in customer-facing products, agency portals, or B2B platforms. Row-Level Security passes through the embed token's effective identity instead of through Entra group memberships.
For the rest of this guide we use the app-owns-data pattern, since it's the one that solves the SaaS embedding problem most people are actually trying to solve. If you're embedding for internal Microsoft 365 users only, see Microsoft's user-owns-data documentation — the architecture is simpler.
For the broader context on Power BI Embedded as a category, see our complete Power BI Embedded guide and the 2026 Power BI Embedded technical guide.
What you need before you start
The prerequisites that catch most teams off-guard:
A Microsoft Fabric F SKU capacity. Power BI Embedded runs on Fabric capacities since the A SKUs were retired in 2024. F2 starts around €263/month pay-as-you-go and is enough for production workloads when data models are well-optimised. Buy via Azure Portal or Microsoft 365 admin centre.
A Microsoft Entra ID tenant with admin access. You'll create an app registration, grant API permissions, and configure a service principal. Without tenant admin (or the cooperation of one), you can't complete the setup.
A Power BI workspace assigned to the Fabric capacity. Reports must live in a workspace that's on your Fabric capacity, not a regular Power BI workspace. Create or convert in the Power BI admin portal.
A backend service. Power BI embed tokens are short-lived and must be generated server-side using the service principal's credentials. Don't try to embed Power BI from a pure frontend application — the credentials would leak to the browser.
Reports already built in Power BI Desktop. This guide covers the embedding mechanics, not report design. Build the reports you want to embed first, publish them to your workspace, then proceed with embedding.
Frontend code that can render JavaScript. The Power BI JavaScript SDK renders reports into a container element. Any modern frontend (React, Vue, Angular, vanilla JS) works.
If any of these are missing, set them up first. Half the "Power BI embedding is broken" support tickets are actually missing prerequisites.
Step 1: Set up your Fabric capacity and workspace
In the Azure Portal, create a Microsoft Fabric F SKU capacity. F2 is the minimum recommended size for production embedded workloads.
Once provisioned, go to the Power BI admin portal → Capacity settings → Power BI Premium tab → and verify the capacity is visible. Assign capacity administrators (typically your team's Power BI lead).
In Power BI Service, create a new workspace (or use an existing one) and in the workspace settings, set the licence mode to "Premium per capacity" or "Fabric capacity" and select your newly created capacity. Reports in this workspace can now be embedded.
Publish your reports to this workspace from Power BI Desktop using "Publish" → select the workspace. Note the workspace ID and report IDs — you'll need them when generating embed tokens. You can find these in the URL when viewing the workspace and report in Power BI Service.
Step 2: Register an application in Microsoft Entra ID
Go to the Azure Portal → Microsoft Entra ID → App registrations → New registration.
Configure the registration:
- Name: something descriptive like "MyApp Power BI Embedding"
- Supported account types: "Accounts in this organizational directory only" (single tenant)
- Redirect URI: can be left blank for service principal authentication
After registration, note the Application (client) ID and Directory (tenant) ID — you'll need both. These are visible on the app registration's Overview page.
Generate a client secret: Certificates & secrets → New client secret → set an expiry (24 months is reasonable, less is more secure). Copy the secret value immediately — it's only visible once. Store it in your backend's secret management system, never in source code.
Step 3: Configure API permissions and the service principal
In your app registration → API permissions → Add a permission → Microsoft Graph → Application permissions. The exact permissions depend on your scenario, but for app-owns-data embedding you typically need:
User.Read.All(sometimes)- Group permissions if you'll use security groups
More importantly, the service principal needs Power BI access. Go to the Power BI admin portal → Tenant settings → Developer settings → Allow service principals to use Power BI APIs → enable for a specific security group → add your service principal to that group.
This step is where most "permission denied" errors come from. Without the tenant-level setting enabled, the service principal can't access Power BI APIs regardless of API permissions on the app registration.
Finally, give the service principal access to the workspace: Power BI Service → your workspace → Manage access → Add people or groups → search for your app registration's name → assign Admin or Member role.
Step 4: Build the backend embed token service
This is where the real work begins. Your backend needs to:
- Authenticate to Microsoft Entra ID using the service principal credentials
- Get an access token for the Power BI API
- Use that access token to request an embed token for a specific report and user
- Return the embed token to your frontend
Here's a working Node.js implementation using the @azure/msal-node and axios libraries:
javascript
const msal = require("@azure/msal-node");
const axios = require("axios");

const config = {
  auth: {
    clientId: process.env.AZURE_CLIENT_ID,
    authority: `https://login.microsoftonline.com/${process.env.AZURE_TENANT_ID}`,
    clientSecret: process.env.AZURE_CLIENT_SECRET,
  },
};

const cca = new msal.ConfidentialClientApplication(config);

async function getPowerBiAccessToken() {
  const tokenRequest = {
    scopes: ["https://analysis.windows.net/powerbi/api/.default"],
  };

  const response = await cca.acquireTokenByClientCredential(tokenRequest);
  return response.accessToken;
}

async function getEmbedToken(workspaceId, reportId, customerId) {
  const accessToken = await getPowerBiAccessToken();

  // Get report details (needed for the embed URL)
  const reportResponse = await axios.get(
    `https://api.powerbi.com/v1.0/myorg/groups/${workspaceId}/reports/${reportId}`,
    { headers: { Authorization: `Bearer ${accessToken}` } }
  );

  const report = reportResponse.data;

  // Request an embed token with effective identity for RLS
  const embedTokenResponse = await axios.post(
    `https://api.powerbi.com/v1.0/myorg/GenerateToken`,
    {
      reports: [{ id: reportId }],
      datasets: [{ id: report.datasetId }],
      identities: [
        {
          username: customerId,
          roles: ["CustomerRole"],
          datasets: [report.datasetId],
        },
      ],
    },
    {
      headers: {
        Authorization: `Bearer ${accessToken}`,
        "Content-Type": "application/json",
      },
    }
  );

  return {
    embedToken: embedTokenResponse.data.token,
    embedUrl: report.embedUrl,
    reportId: reportId,
    expiration: embedTokenResponse.data.expiration,
  };
}

module.exports = { getEmbedToken };
Expose this as an authenticated endpoint in your application:
javascript
app.get("/api/embed-token/:reportId", authenticateUser, async (req, res) => {
  try {
    const customerId = req.user.tenantId; // from your auth system
    const reportId = req.params.reportId;
    const workspaceId = process.env.POWERBI_WORKSPACE_ID;

    const embedData = await getEmbedToken(workspaceId, reportId, customerId);
    res.json(embedData);
  } catch (error) {
    console.error("Embed token error:", error);
    res.status(500).json({ error: "Failed to generate embed token" });
  }
});
Important security notes: Never expose your service principal credentials to the frontend. The embed token endpoint must be authenticated — anyone who can call it can render reports for any customer ID they specify. Validate that the requested report is allowed for the authenticated customer before generating the token.
Step 5: Add the Power BI JavaScript SDK to your frontend
Install the SDK in your frontend project:
bash
npm install powerbi-client powerbi-client-react
(Use powerbi-client directly for non-React frontends.)
Step 6: Embed the report
The basic React integration:
jsx
import React, { useState, useEffect } from "react";
import { PowerBIEmbed } from "powerbi-client-react";
import { models } from "powerbi-client";

function EmbeddedReport({ reportId }) {
  const [embedConfig, setEmbedConfig] = useState(null);
  const [error, setError] = useState(null);

  useEffect(() => {
    fetch(`/api/embed-token/${reportId}`, {
      headers: {
        Authorization: `Bearer ${getAuthToken()}`,
      },
    })
      .then((res) => res.json())
      .then((data) => {
        setEmbedConfig({
          type: "report",
          id: data.reportId,
          embedUrl: data.embedUrl,
          accessToken: data.embedToken,
          tokenType: models.TokenType.Embed,
          settings: {
            panes: {
              filters: { expanded: false, visible: false },
              pageNavigation: { visible: true },
            },
            background: models.BackgroundType.Transparent,
          },
        });
      })
      .catch((err) => setError(err.message));
  }, [reportId]);

  if (error) return <div>Error loading report: {error}</div>;
  if (!embedConfig) return <div>Loading report...</div>;

  return (
    <PowerBIEmbed
      embedConfig={embedConfig}
      eventHandlers={
        new Map([
          ["loaded", () => console.log("Report loaded")],
          ["rendered", () => console.log("Report rendered")],
          ["error", (event) => console.error("Embed error:", event.detail)],
        ])
      }
      cssClassName="report-style-class"
      getEmbeddedComponent={(embeddedReport) => {
        window.report = embeddedReport;
      }}
    />
  );
}

export default EmbeddedReport;
A few important configuration details:
Token type must be Embed, not Aad. The token from your backend is an embed token, not an Azure AD token, even though it was generated using Azure AD authentication.
The panes configuration controls which Power BI UI elements show. For a clean customer-facing experience, hide the filters pane and keep page navigation visible. Other panes (selection, visualisation, fields) are for editing and should stay hidden.
Background should be Transparent so the report blends with your application's styling. Otherwise you get a white Power BI background that looks out of place.
Step 7: Configure Row-Level Security
For multi-tenant embedding, every customer must see only their own data. This is configured in two places: the Power BI dataset (via DAX rules), and the embed token (via effective identity).
In Power BI Desktop, open the dataset → Modeling tab → Manage roles → New role. Define a role called "CustomerRole" with a DAX rule like:
dax
[CustomerID] = USERNAME()
This filters the underlying table to rows where the CustomerID column matches the username passed in the embed token's effective identity. Republish the dataset.
In your backend's embed token generation (Step 4), the identities block already passes username: customerId and roles: ["CustomerRole"]. The DAX rule reads the customer ID via USERNAME() and filters accordingly.
Testing RLS: Generate an embed token with username: "customer-A" and verify the report shows only customer A's data. Generate another with username: "customer-B" and verify it shows only customer B's. Never trust that RLS works without explicitly testing both positive (correct data shown) and negative (other customer's data hidden) cases.
See the complete Row-Level Security guide for Power BI for deeper RLS patterns including dynamic RLS, role hierarchies, and common pitfalls.
Step 8: Handle token expiration and refresh
Embed tokens expire after one hour by default. Long-running sessions need to refresh the token before it expires, or the report stops rendering.
The pattern: track the token expiration time, set a timer for 5 minutes before expiry, fetch a new token from your backend, and call the Power BI embedded component's setAccessToken() method.
javascript
const refreshToken = async () => {
  const response = await fetch(`/api/embed-token/${reportId}`);
  const data = await response.json();
  await window.report.setAccessToken(data.embedToken);
};

// Set timer for 5 minutes before expiry
const refreshTime =
  new Date(embedConfig.expiration).getTime() - Date.now() - 5 * 60 * 1000;
const timer = setTimeout(refreshToken, refreshTime);

// Don't forget to clear on unmount
return () => clearTimeout(timer);
In practice, embed token expiration is one of the most common production issues with custom Power BI embedding. Test long sessions explicitly — leave a dashboard open for 90+ minutes and verify it continues working.
Step 9: Configure branding and theming
The Power BI SDK supports custom themes for your embedded reports. In Power BI Desktop, customise the report theme to match your brand colours, fonts, and styling. Save the theme as a JSON file.
In your embed config, apply the theme:
javascript
settings: {
  customTheme: {
    themeJson: yourThemeJson,
  },
  // ... other settings
}
For real white-labelling beyond report-level theming (custom domain, branded login, per-tenant branding), you need a portal layer wrapped around the embedded reports. This is where the "embed Power BI" project usually balloons in scope — see white-label embedded analytics for what's actually required.
Step 10: Deploy and operate
Before going to production:
Test multi-tenant isolation rigorously. Generate tokens for different customer IDs, verify each sees only their own data, attempt cross-tenant queries that should fail. See the multi-tenant analytics guide for the full testing matrix.
Monitor capacity usage. Install the Microsoft Fabric Capacity Metrics app from AppSource. Watch CU consumption, especially around refresh windows. Capacity overload causes report rendering to slow or fail.
Set up audit logging. Power BI's audit logs are at the tenant level by default. For per-viewer audit (who saw which report when), you need to log this in your application layer when generating embed tokens.
Handle errors gracefully. Network failures, expired tokens, invalid configurations, and capacity issues all need user-friendly error messages. Don't show raw Power BI error responses to end users.
Plan for ongoing maintenance. Microsoft updates the Power BI REST API and the JavaScript SDK regularly. Embed tokens, capacity behaviour, and authentication patterns occasionally change. Someone on your team needs to own this.
Common errors and how to fix them
The errors you'll most likely hit:
"401 Unauthorized" when calling the Power BI API. Service principal isn't enabled in the Power BI admin portal (tenant setting), or the service principal isn't a member of the workspace. Check both before assuming code issues.
"403 Forbidden" when generating embed token. The dataset doesn't have RLS configured but the embed token includes effective identity, or vice versa. Embed tokens with identity require RLS roles; tokens without identity don't.
"Cannot read property 'embedUrl' of undefined" on the frontend. Your backend isn't returning the data in the format the frontend expects. Verify the response structure matches what the SDK needs.
Reports load but show no data. RLS rule is filtering out all rows because the effective identity isn't matching any customer ID. Check that the username passed in the embed token matches values in the customer ID column.
"Token has expired" mid-session. Token refresh isn't implemented or the timer is broken. Implement the refresh pattern from Step 8 and test long sessions.
Capacity overload errors. Your F SKU is too small for the workload, or a refresh is consuming all capacity. Either size up, optimise the data model, or stagger refreshes.
CORS errors when loading the embed URL. Your frontend domain isn't on Power BI's allowed origin list. This is rare but happens; check the embed URL's domain and your CSP configuration.
Report renders but interactivity is broken. Usually a CSP (Content Security Policy) issue. Power BI's embed requires specific iframe and script sources allowed. Update your CSP to include frame-src https://app.powerbi.com and similar directives.
The honest timeline
Most teams underestimate how long this takes. The actual realistic timeline:
Week 1-2: Setup and prerequisites. Fabric capacity, app registration, workspace configuration, service principal permissions. Looks fast on paper, eats time in practice because of organisational coordination (admin access, security review).
Week 3-5: Backend embed token service. Code is straightforward but error handling, token refresh, multi-tenant routing, and security review take longer than expected. Add another week for unit and integration tests.
Week 6-10: Frontend integration. SDK integration, theming, branding, error handling, multi-report navigation, mobile responsiveness. Edge cases multiply here.
Week 11-14: RLS implementation and multi-tenant testing. This is the riskiest phase. Multi-tenant isolation testing is non-trivial and skipping it is dangerous. Budget significant time for security review.
Week 15-18: Operational tooling. Monitoring, audit logging, capacity metrics, customer onboarding flows, support tooling.
Week 19-26: Polish and rollout. Performance optimisation, customer-specific feature requests, documentation, training, phased rollout.
Total: 4-6 months for a small engineering team of 2-3 people. Smaller team or part-time engineers — longer. Plus ongoing maintenance forever.
This is why platforms like DataTako exist. The work above is real, necessary, and undifferentiated for your product. Building it takes engineering capacity that doesn't move your business forward.
When to use DataTako instead
DataTako handles steps 1 through 10 above as configuration rather than engineering work. You connect your Fabric capacity, point DataTako at your workspaces, and the embedded portal with multi-tenancy, RLS, branding, and operational tooling is live in hours.
What's included that you'd otherwise build yourself:
- Embed token generation and refresh — automated, no backend service required
- Multi-tenant Row-Level Security wired to your customer identities
- White-label branded portal with custom domain, your logo, your colours
- Per-viewer audit logs at the granularity compliance teams want
- Automated capacity management that pauses and resumes Fabric to cut costs
- User and group management without Entra ID administration
- Operational monitoring for capacity usage, errors, and performance
A typical setup: Fabric F2 capacity (~€263/month) + DataTako licence for 100 users (~€200/month) + a few Pro licences for creators (~€70/month). Total around €530/month for unlimited customer access — versus four to six months of engineering work building the same thing.
Teams that would have spent months on the steps above are sharing branded Power BI analytics within hours of signing up. See how DataTako works for the architecture details or read the MeerMetData case study.
If you're sure you want to build it yourself — analytics is your core product, you have specific UX requirements, your team has the capacity — the guide above is the complete path. If you'd rather your engineers work on what differentiates your product, DataTako removes this entire project from your roadmap.
For the broader build-versus-buy decision, see build vs buy embedded analytics.
Frequently asked questions
Can I embed Power BI in any website? Yes, with the right architecture. App-owns-data embedding requires a Microsoft Fabric capacity, an Entra ID app registration, a backend service to generate embed tokens, and a frontend that uses the Power BI JavaScript SDK. The technical mechanics work in any web framework.
Do my website's visitors need Power BI licences? No — with app-owns-data embedding on a Fabric capacity, visitors don't need Microsoft accounts or licences. The service principal authenticates centrally and embed tokens carry whatever identity your application uses.
How much does it cost to embed Power BI? Microsoft Fabric F2 capacity starts around €263/month and supports unlimited viewers. Plus engineering time for the integration (4-6 months for a custom build) or platform fees (€200-€500/month for a managed solution like DataTako).
Can I embed Power BI without writing any code? Not with native Microsoft tooling — embedding requires backend code for token generation at minimum. Managed platforms like DataTako abstract this so you don't write code yourself; you configure the portal through a UI.
What's the difference between Publish to Web and Power BI Embedded? Publish to Web generates a public URL anyone can view, with no authentication or security. Power BI Embedded gives you authenticated, identity-aware embedding inside your own application with full Row-Level Security. They solve different problems and aren't comparable.
How long does it take to embed Power BI in a website? A working proof-of-concept takes a few days. A production-ready, multi-tenant, branded portal takes 4-6 months for a small engineering team. DataTako provides the same outcome in hours through configuration rather than engineering.
Can I embed Power BI in a React, Vue, or Angular app? Yes, all modern frontend frameworks work. Microsoft provides the powerbi-client library and powerbi-client-react React wrapper. Vue and Angular use the base library with framework-specific integration patterns.
How do I make sure each customer sees only their own data? Row-Level Security in the Power BI dataset, plus effective identity in the embed token. The DAX RLS rule filters data based on the username passed through the token. Test multi-tenant isolation rigorously — see the multi-tenant analytics guide.
What happens when embed tokens expire? Tokens expire after one hour by default. Your frontend needs to refresh the token before expiry by calling your backend's token endpoint and calling setAccessToken() on the embedded report. Without refresh, long sessions break.
Can I white-label the embedded Power BI experience? Partially with native tooling — you can theme reports and hide some UI panes. Full white-labelling (custom domain, branded login, no Microsoft branding, per-tenant branding) requires a portal layer around the embedded reports. See white-label embedded analytics.
